Using React Components in Stimulus Controllers
Stimulus is a JavaScript framework that works well with server-rendered HTML. It’s designed to enhance your HTML with just enough JavaScript to make it interactive, without taking over your entire front-end.
But what if we need the power of React components for specific complex UI elements while keeping the simplicity of Stimulus for the rest of our application? In this post, we’ll explore how to integrate React components within Stimulus controllers to get the best of both worlds.
The Integration Challenge
Modern Rails applications often utilize Stimulus as their primary JavaScript framework. It’s lightweight, follows Rails’ conventions, and focuses on enhancing existing HTML rather than replacing it. However, there are scenarios where more complex UI components with rich interactions and state management are needed.
This is where React shines. But switching our entire frontend to React would be overkill when most of our application works perfectly with Stimulus. The ideal solution is to combine both frameworks strategically.
Architecture Overview
Here’s a high-level overview of how React and Stimulus can be integrated in a Rails application:
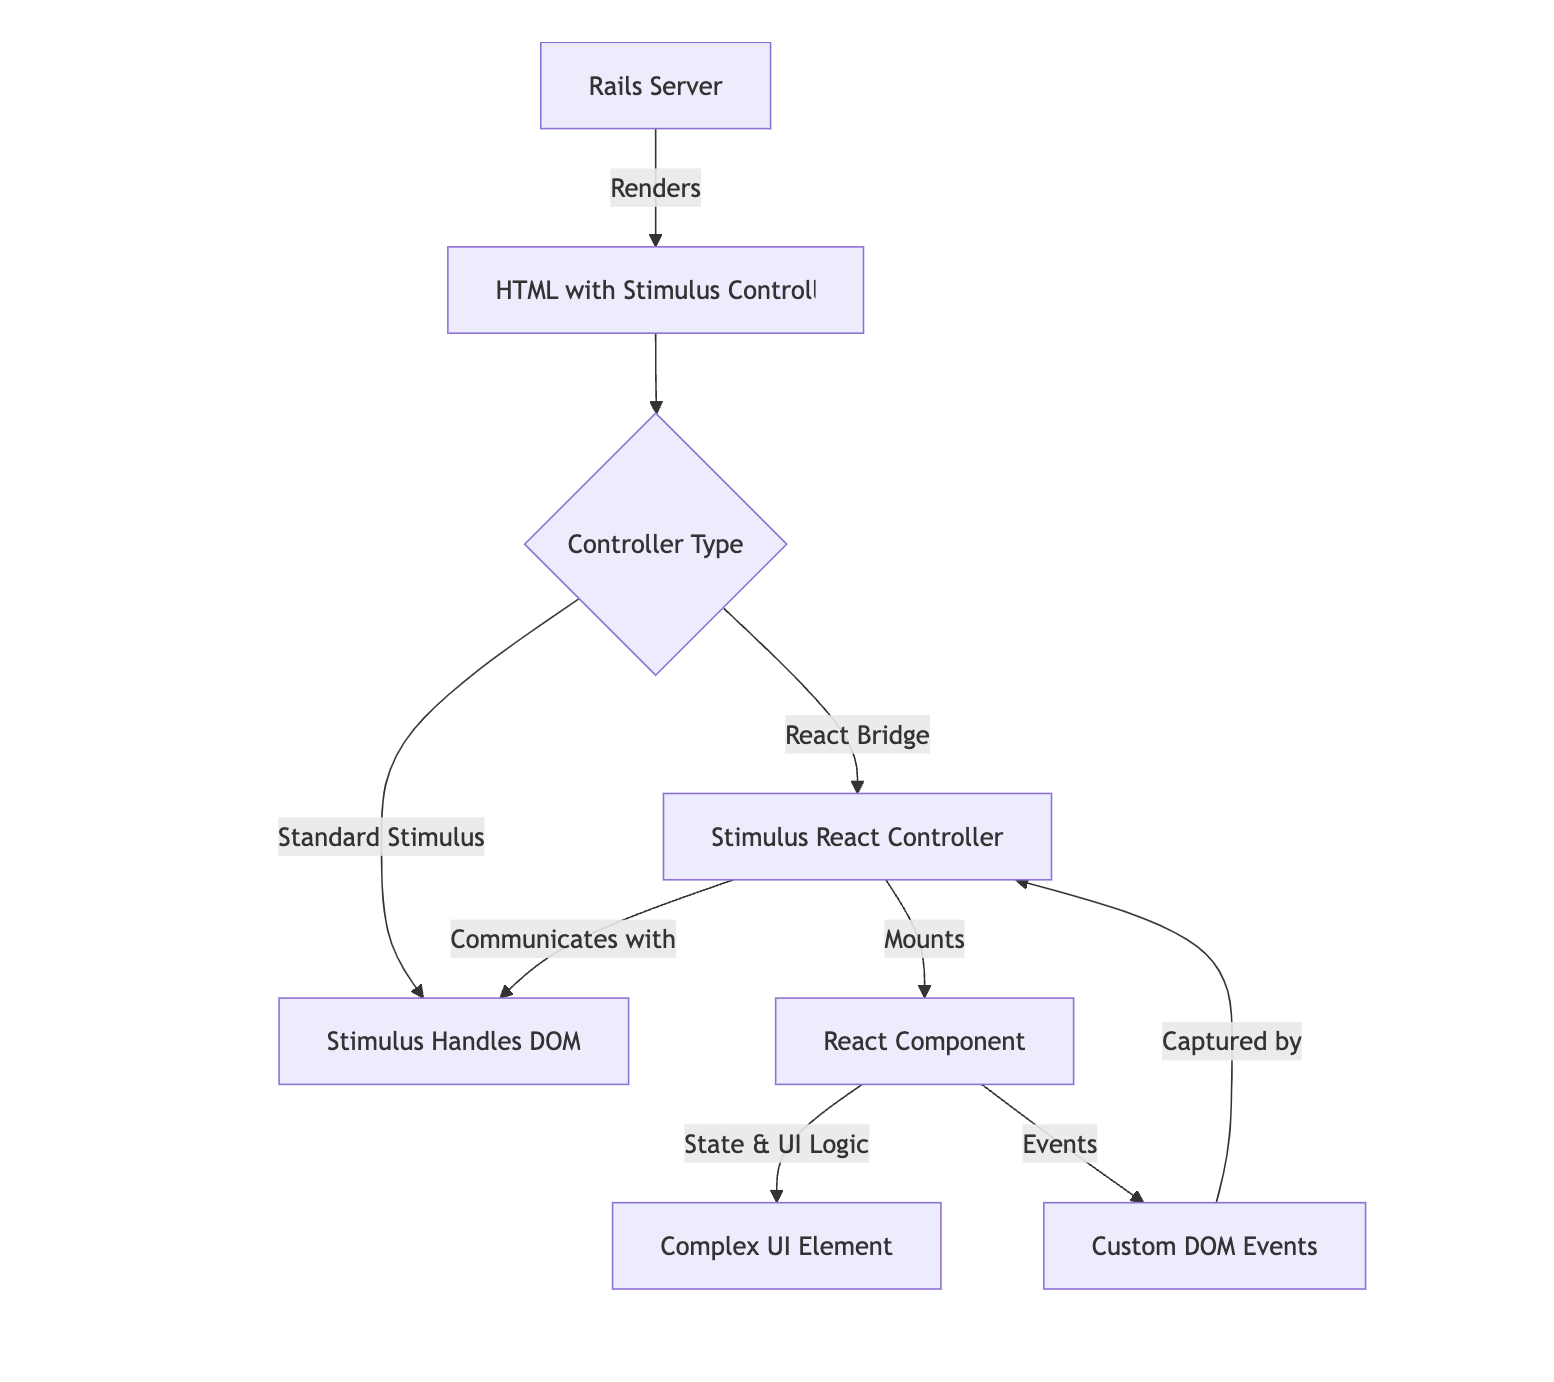
This architecture allows to:
- Keep Rails views simple and server-rendered where possible
- Use Stimulus for most interactions and DOM manipulations
- Leverage React only for complex UI components that benefit from its capabilities
- Maintain a clean separation of concerns
Setting Up Rails Application
To implement this architecture, we will need to set up both Stimulus and React in our Rails application. Modern Rails applications (Rails 7+) come with Stimulus through the Hotwire stack. For React integration, we can use the react-rails gem or add react dependencies to package.json if we handle assets pipeline through utilities like esbuild:
# Using yarn
yarn add react react-dom

# Using npm
npm install react react-dom --save
The Bridge: Creating a Stimulus Controller for React
The key to this integration is creating a special Stimulus controller that serves as a bridge to React components. This controller will:
- Identify which React component to render
- Pass data from your Rails backend to React as props
- Handle the component lifecycle, including mounting and unmounting
- Enable communication between React and the rest of your application
Here’s the conceptual approach for a react_component_controller:
// Simplified concept of a React-Stimulus bridge controller
import { Controller } from "@hotwired/stimulus"
import React from "react"
import { createRoot } from "react-dom/client"

export default class extends Controller {
  static values = {
    name: String,    // Which React component to render
    props: Object    // Data to pass to the component
  }

  connect() {
    // Mount the React component when Stimulus connects
    // (code simplified for clarity)
  }

  disconnect() {
    // Clean up React component when Stimulus disconnects
  }
}
This approach abstracts away the complexity of React from our Rails templates, letting us use a familiar Stimulus syntax.
Integrating in Rails Views
Using our React-Stimulus bridge in Rails views becomes remarkably simple. The HTML looks just like any other Stimulus controller, hiding the complexity of React behind a familiar interface:
<!-- Example usage in a Rails view -->
<div
  data-controller="react-component"
  data-react-component-name-value="data-chart"
  data-react-component-props-value="<%= {
    dataUrl: '/api/analytics/user_activity',
    title: 'Weekly User Activity'
  }.to_json %>"
></div>
This approach has several benefits:
- Rails-centric view templates - Our templates remain mostly ERB without JSX
- Progressive enhancement - Add React only where needed
- Server-rendered foundation - Initial page loads are fast with server-rendered HTML
- Clear boundaries - React components have explicit mount points
Communication Patterns Between React and Stimulus
For the integration to be truly useful, React components need to communicate with the rest of our application. There are three main communication patterns:
1. Rails → React (Data Down)
The most straightforward pattern is passing data from our Rails backend to React components as props. This data is serialized as JSON and passed through the Stimulus controller’s values API:
data-react-component-props-value="<%= {
  user: current_user.as_json(only: [:id, :name, :email]),
  editable: current_user.can_edit?(@profile)
}.to_json %>"
2. React → Rails (Events Up)
When a React component needs to communicate back to our Rails application, it can dispatch custom DOM events that are captured by Stimulus controllers:
// Inside a React component after a significant state change
const event = new CustomEvent('userProfileUpdated', {
  detail: { user: updatedUserData },
  bubbles: true
})
this.rootElement.dispatchEvent(event)
These events can then trigger server requests, update other parts of the UI, or communicate with other Stimulus controllers.
3. React → Stimulus (Component Coordination)
React components can coordinate with other Stimulus controllers through the Stimulus application instance:
Practical Example: Integrating a React OTP Component
Let’s walk through a practical example using react-otp-input, a popular React component for one-time password (OTP) verification. This component provides a polished, accessible input experience for verification codes that would be complex for us to build with just Stimulus.
Installing the React OTP Component
First, install the React OTP component using yarn or npm:
# Using yarn
yarn add react-otp-input

# Using npm
npm install react-otp-input --save
Creating a Simple React Wrapper
Next, create a React component that wraps the OTP input and handles sending the verification code to your server:
// app/javascript/components/OtpVerification.jsx
import React, { useState } from 'react';
import OtpInput from 'react-otp-input';

const OtpVerification = ({ verifyUrl, redirectUrl }) => {
  const [otp, setOtp] = useState('');
  const [isVerifying, setIsVerifying] = useState(false);
  const [error, _] = useState(null);

  // When OTP is complete (6 digits), verify it
  const handleChange = (code) => {
    setOtp(code);
    if (code.length === 6) handleVerify(code);
  };

  // Send verification request to the server
  const handleVerify = (code) => {
    setIsVerifying(true);

    // API call details omitted for brevity
    // On success: dispatch 'otpVerified' event and redirect
    // On failure: show error and reset input
  };

  return (
    <div className="otp-verification">
      <h3>Enter Verification Code</h3>
      <p>Please enter the 6-digit code sent to your device</p>

      <OtpInput
        value={otp}
        onChange={handleChange}
        numInputs={6}
        separator={<span>-</span>}
        renderInput={(props) => <input {...props} />}
        shouldAutoFocus={true}
        disabled={isVerifying}
      />

      {isVerifying && <p className="verifying">Verifying...</p>}
      {error && <p className="error">{error}</p>}
    </div>
  );
};

export default OtpVerification;
The React component above has been simplified, focusing on the key concepts. In a real application, you would implement the full verification logic, error handling, and styling.
Creating a Stimulus Controller Bridge
Create a Stimulus controller that will mount the React OTP component:
// app/javascript/controllers/otp_verification_controller.js
import React from "react";
import { Controller } from "@hotwired/stimulus";
import { createRoot } from "react-dom/client";
import OtpVerification from "../components/OtpVerification.jsx";

export default class extends Controller {
  static values = {
    verifyUrl: String,
    redirectUrl: String
  }

  connect() {
    this.root = createRoot(this.element);
    this.root.render(
      <OtpVerification
        verifyUrl={this.verifyUrlValue}
        redirectUrl={this.redirectUrlValue}
      />
    );

    document.addEventListener('otpVerified', this.handleVerification);
  }

  disconnect() {
    document.removeEventListener('otpVerified', this.handleVerification);
    if (this.root) this.root.unmount();
  }

  handleVerification = (event) => {
    // Update UI elements outside the React component
  }
}
Using the OTP Component in a Rails View
Now we can use our OTP verification component in a Rails view:
<!-- app/views/verifications/new.html.erb -->
<div class="otp-container">
  <div
    data-controller="otp-verification"
    data-otp-verification-verify-url-value="<%= verify_otp_path %>"
    data-otp-verification-redirect-url-value="<%= dashboard_path %>"
  ></div>
</div>
The Complete Picture
This example demonstrates the full integration pattern:
- We use an existing React component library to handle the complex OTP input UI
- The React component is wrapped in a small adapter that handles our specific business logic
- A Stimulus controller acts as a bridge to mount the React component
- Custom events provide communication between React and other parts of the page
- The Rails view remains simple and clean, with standard Stimulus data attributes
The result is a seamless user experience that leverages the strengths of both frameworks:
Implementation Challenges and Solutions
Handling React Lifecycle with Turbo
One significant challenge when integrating React with Rails is managing component lifecycles during Turbo page navigations. Turbo Drive preserves parts of the DOM during page transitions, which can lead to React components not being properly unmounted.
To address this, our React-Stimulus bridge needs to listen for Turbo navigation events:
// Simplified lifecycle management with Turbo
initialize() {
  // Listen for Turbo navigation events
  document.addEventListener('turbo:before-visit', this.teardown)
}

teardown() {
  // Properly unmount React when navigation occurs
}

disconnect() {
  this.teardown()
  // Clean up event listeners
}
Server-Side Rendering Considerations
For optimal performance, we should consider whether our React components need server-side rendering. Options include:
- Client-only rendering - Simplest approach, but can lead to content flicker
- Server-side rendering with react-rails - More complex but provides better UX
- Hybrid approach - Server-render a skeleton, enhance with React on the client
The right approach depends on our specific performance requirements and the complexity of our components.
More Real-World Use Cases
Rich Text Editors
Integrating editors like Draft.js, Slate, or TipTap as React components while using Stimulus for the surrounding UI elements like toolbars and format controls.
Interactive Dashboards
Using React for complex chart visualizations and data grids within a Stimulus-managed dashboard layout that handles filtering, date range selection, and navigation.
Multi-step Forms
Implementing complex multi-step forms with conditional logic as React components while keeping the form submission and validation handled by Rails and Stimulus.
Date and Time Pickers
Incorporating sophisticated date pickers like react-datepicker or react-datetime into our forms while keeping the rest of the form managed by Rails.
Interactive Maps
Using react-leaflet or react-map-gl for complex map interfaces while keeping the surrounding application using the standard Rails and Stimulus patterns.
Wrap-up
In this post, we’ve explored how to integrate React components within Stimulus controllers in a Rails application. This hybrid approach gives us the best of both worlds:
- Simplified architecture - Use the right tool for each UI need
- Performance benefits - Server-rendering for most of the app, rich interactions where needed
- Developer experience - Rails conventions with React’s component model where beneficial
- Future flexibility - Easy to evolve specific parts of your UI independently
Remember that we don’t need to choose between a fully server-rendered approach or a complete single-page application. Modern web development is about pragmatic choices - using the right tool for each specific challenge while maintaining an integrated, cohesive application architecture.